UDS Data Mapper
User Guide
Overview
The UDS Data Mapper streamlines the process of generating and distributing UDS records, acting as a bridge between Liquidators and Guaranty Funds. With its web-based interface, the Data Mapper offers an intuitive platform that simplifies each step, from initial upload to delivery.
This user guide will outline three key phases for seamless use: Account Setup, Testing, and Production. During the setup phase, users configure their accounts, including any necessary users or access requirements. Following that, the Testing phase enables data examination through a trial run, ensuring both data accuracy and system compatibility before transitioning to full-scale Production.
Central to the Data Mapper’s functionality is its seamless integration with SUDS cloud storage, enabling efficient communication between Liquidators and Guaranty Funds. This integration ensures that the files generated through the mapper are securely transmitted to the designated recipients, enhancing collaboration and expediting the claims process.
Workflow
Getting Started

1. Creating Account
If this is the first time your organization is using the Data Mapper, you must contact GSI before proceeding.
Create an account for the UDS Data Mapper by clicking on ‘Register a New User‘ from the top of the Data Mapper home page and filling out the provided form.
You must create an individual account for each user inside your organization that will be accessing the Data Mapper. Users within the same organization share access to files and queues. Sharing credentials is not allowed.
2. Creating SUDS Account
In order to upload images and use the Data Mapper you will also need a SUDS account. You should have received an email from GSI containing the necessary info to create your SUDS account, we also have a more detailed instructional video.
If you have not received an email about your SUDS account after registering a UDS Data Mapper account please Contact GSI.
3. Managing Account
Once logged in to your Data Mapper account you will see a tab at the top of the screen titled ‘Account Management’.
Here you will pages to change the password or email associated with your account. Here you will also see an option to enable Two Factor Authorization using your preferred authenticator application.
4. Managing Notifications
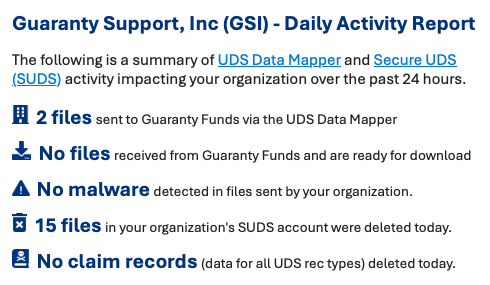
By default, each user will receive a Daily Activity Report summarizing the related actions performed that day as well as instant email notifications about C and D records. To opt out of one or both of these Contact GSI.
You may also add additional contacts to receive UDS notifications for your account if desired, this would also be accomplished by contacting GSI.
Testing

l. Overview
Running a testing phase before full production is essential for ensuring proficiency with the Data Mapper and confirming that resulting UDS files can be correctly imported by the Guaranty Funds claim systems. Within the Data Mapper, there’s no official differentiation between ‘Test’ and ‘Real’ data. To facilitate testing, we suggest generating A, F, G, and I records and marking them as “Test Data” in the email header upon submission. This approach ensures that Guaranty Funds receive the data exactly as they will in production, allowing for feedback or fixes before sending large datasets. After the testing period, it’s up to you and the Guaranty Funds to decide whether to retain any ‘acceptable’ testing data. Many liquidators opt to delete all ‘sent’ testing data to start afresh before production.
1. Uploading Files
It’s easy to upload files to the mapper. To create an A record, for example, ensure you have a CSV copy of your data ready.
- Log into your UDS Data Mapper account
- Navigate to the ‘Upload/Manage Files’ tab at the top of the page
- Click on ‘Upload/Download My Files’
- If this is your first time using the Data Mapper, you likely won’t have any files to view yet
- To upload your CSV, click on the directory associated with your NAIC
- Either drag and drop your CSV file or select it from the ‘Choose Files’ option
Now your file is available for you and your team to use!
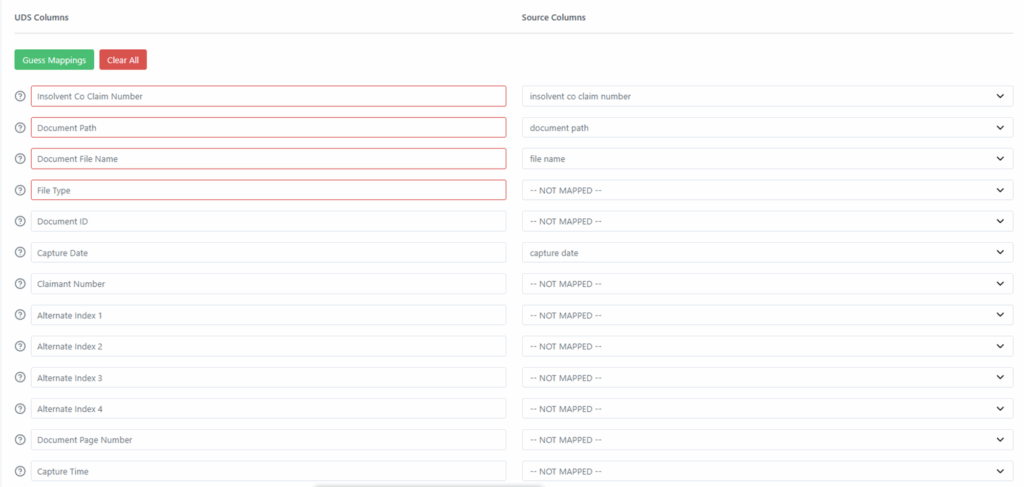
Screenshot of mapping process
2. Creating Maps
To create any kind of UDS file in the Data Mapper, you first need to make a map for your data. This provides a bridge from the data format of your csv files to the Data Mapper so we can automate the creation of your UDS files. Assuming you use the same headers/format for your csv files you will only need to make one map for each record type, although you are able to create as many maps as you’d like, if other people on your team use different file formats for the same record types.
Creating a Map:
- Navigate to ‘Create a Map’ at the top of the page
- Select your chosen record type
- On the map creation page:
- Click ‘Choose a different file’
- Select the CSV file you uploaded in the previous step
- The Data Mapper will display the headings of your file on the left-hand side
- Drag your headers to their corresponding headers on the right-hand side
- You are only required to provide values for the red headers
- You can map a default value for the required fields with default values
- Once your headers are mapped:
- Add a name to save your map for future reference
- Click save
3. Producing Records
After submitting your job, it’s important to check and see if there were any errors, especially when testing. You can view the status of your job by going to
‘View My Records’ > ’Job Errors’ > [record type] Record Job Errors
Here you will see a dropdown with your list of errors or you can download a file of rows from your uploaded file that contained any errors. Take a look at our Common Job Errors down below for help resolving them.
4. Sending Records
Navigate to ‘Send Records’ at the top of the page
You can delete or send records from this page by simply choosing your desired action from the dropdown and selecting your files and clicking ‘Next’
5. Managing Sent Batches
There are two different way to view your record history in the UDS Data Mapper:
‘View My Records’>’All My Records’
View all your records by claim number and see the associated records in our database (F,G,I,etc)
‘Upload/Manage Files’>’Sent Records’>NAIC Num> Batch Num
View record history by the batches sent from your account.
When viewing the Sent Records Batch History, you have the option to “unsend” or “recall” records
Production

1. Fixing UDS records based on feedback
After sending your testing records, you may receive feedback from the Guaranty Funds that something about your records needs to be modified. To resend fixed records you can recall your previously sent UDS records, removing them from the UDS Data Mapper’s database. After the records have been recalled, you may reupload and send the fixed records.
2. Producing records with full data set
If your previously sent test records have been positively received, you can now send your full data to the Guaranty Funds. If you only sent a subset of data as test records this will simply be repeating the testing process with full ‘Production’ data.
Some prefer to recall all test data and resend the production data under a clean slate, but depending on the Guaranty Fund some are okay just accepting the testing data if there were no problems.
3. Recalling batches
This process is very similar to fixing UDS records based on feedback, with the exception of reloading (unless requested). Recalling your previously sent UDS records will remove them from the UDS Data Mapper’s database. After the records have been recalled, you may then reupload and send fixed records if needed.
‘Files’ > ‘Sent Batches’ > ‘Recall’
Simply check the records you’d like to recall and click the ‘recall’ button
Then, if needed, proceed reloading and sending records as usual. You may find it helpful to add a comment when resending the records about which recalled batch they are replacing.
Be aware that if you recall A Records, this will also affect the records (F/G/I/M) attached to the A Record. You will need to resend these records as well.
4. Resending batches
Occasionally you may receive a request to send records that have already been previously sent. To do this with the Data Mapper, you can simply mark the records as ‘Unsent’ and send them again.
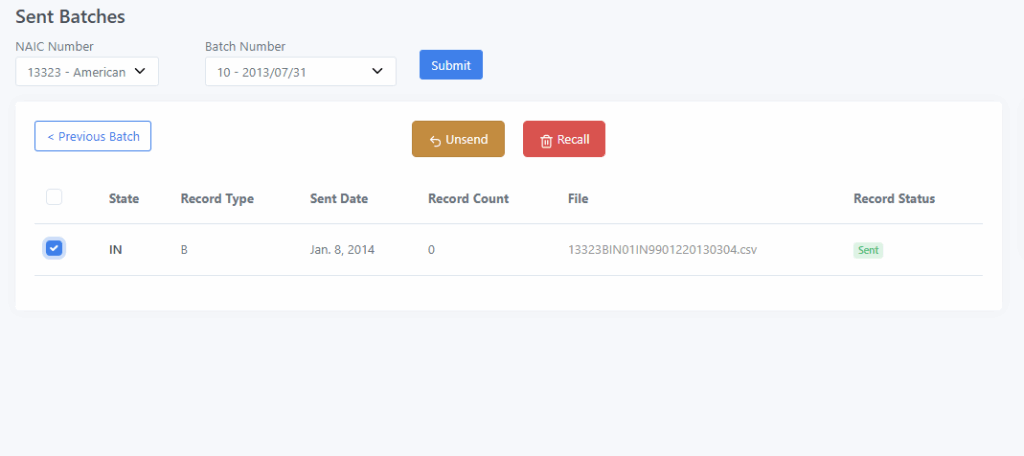
‘Files’ > ‘Sent Batches’ > ‘Unsend’
Simply check the records you’d like to resend and click the ‘unsend’ button below, this will return the selected records back to the Sent Queue
Now you can return to the ‘Manage Files’ page and resend the records as per usual

Screenshot of the sending process, you after records have been unsent, records then repopulate into the ‘Manage Files’ page.
Common Pitfalls (And How to Fix)
Sending by batch is preferred
-
- Keep in mind that the Data Mapper operates by batch, rather than just by state. One batch may have multiple states associated with it, keep this in mind if you’re recalling or unsending any data
Trying to change a bulk amount of rows in in your Data Mapper records
-
- It’s often easier and cleaner to recall the batch (essentially deleting) than reupload & send. This is often better for the Guaranty Fund too, it’s easier to receive a new batch than edit one they’ve imported already
Don’t upload images to your SUDs /ToNCIGF folder
-
- All your images should be inside your /Images folder, indexing your file path as /ToNCIGF/Images will NOT work in Azure, they will need to be directly imported into the correct folder
Recalling A records
-
- Be aware that if you recall A Records this will effect any other attached records you have (documents, payments, etc), these will also need to be resent along with the fixed A records
Common Job Errors (And How to Fix)
Duplicate A Record
-
- This indicates that you or someone on your team has already uploaded this claimant’s A Record. You can either ignore it if unintentional, or if you need to resend it, you can mark it as unsent from your history and resend it.
Image Location Not Found
-
- Typically this means either you have a mistyped path in your csv file for the image or it’s not properly uploaded up on SUDs. Make sure your images are in the proper folder usually: [NAIC]/Images/[Claim Number]/[image file]
Missing A Record
-
- This simply means you haven’t yet uploaded an A record yet for this claimant. F, G, and I records must have an uploaded A record to attach to prior to upload.
Issues with Transaction Amounts
-
- Ensure your transaction amounts are properly formatted. Often this occurs with duplicate decimal points or other unexpected characters caught in this field
The Date is Not Converting Properly
-
- Try converting your dates to YYYYMMDD format, this will usually fix most issues
Users are encouraged to contact GSI Support at [email protected] for any queries or additional assistance.
Thank you for following this tutorial on the UDS Data Mapper.